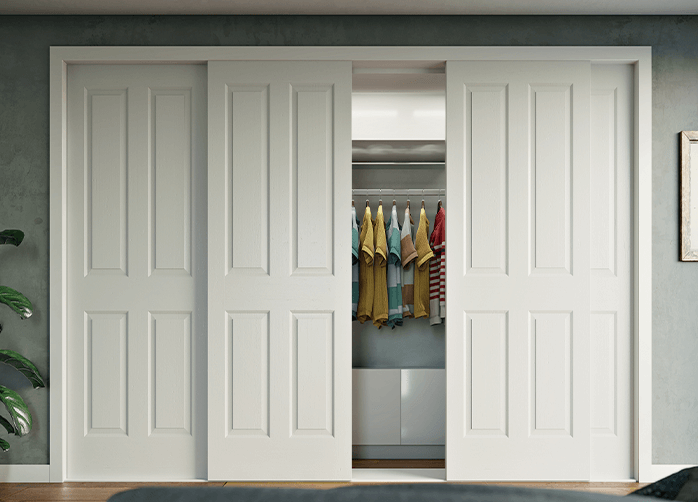
Mastering the Art of Installing Sliding Wardrobe Doors
Installing a sliding wardrobe door can be a tricky task, but with the right tools, measurements, and guidance, it can be a rewarding experience.
With this guide, you can learn the basics of fitting and preparing for the installation, as well as a detailed guide to installing the doors.
With the right preparation and care, you can create a beautiful wardrobe that will last for years.
Key Takeaways
- Proper preparation and measurement are crucial for the successful installation of sliding wardrobe doors.
- Ensure you have all the necessary tools and materials before starting the installation process.
- Follow the manufacturer’s instructions carefully to ensure proper installation of the doors.
- Consider hiring a professional installer or using an installation service for a coordinated and guaranteed project.
Sliding wardrobe doors have become a popular and stylish choice in modern homes. They offer both convenience and space-saving benefits.
Installing them correctly is an essential part of achieving the desired look and functionality. It requires careful measurement, preparation, and knowledge of the installation process.
Evolution of Sliding Wardrobe Doors
The evolution of wardrobe doors has seen a shift from traditional hinged doors to modern sliding doors. Fitting sliding doors is a great way to maximize storage space and enhance the look of any room.
Here are some of the benefits of installing sliding doors:
- Maximize storage space
- Create a sleek, modern look
- Allow for easy access to clothes and items
- Easy to install and maintain
- Can be used in a variety of spaces
Why Opt for Sliding Wardrobe Doors
Sliding wardrobe doors offer a contemporary appearance and feel in addition to design freedom. They are an excellent choice for those looking to maximize their room space, as they require minimal space for installation and movement.
Furthermore, they offer an easy installation process with a variety of features and accessories.
Maximizing Room Space
For homeowners looking to maximize the available space in their bedrooms, sliding wardrobe doors are an ideal solution. Fitting them correctly is key for a successful installation. Here’s how to fit sliding wardrobe doors:
- Build and install interior storage first
- Ensure no obstructions in the installation area
- Fit wall and bottom liners
- Install bottom and wall liners
- Hang the doors onto the tracks
Modern Look and Feel
Offering a sleek and modern aesthetic, sliding wardrobe doors are the perfect way to upgrade any bedroom. Installing wardrobe sliding doors is easy when following the right steps and tips.
Accurately measure the area, select the appropriate size track set and doors, and then install the doors using simple tools. Be sure to check for gaps or misalignments, secure the doors in place, then install any additional accessories.
Follow the manufacturer’s instructions for an easy, stress-free installation, and enjoy the luxurious look and feel of your new sliding wardrobe doors.
Flexibility in Design
Though they provide a modern look and feel, sliding wardrobe doors are also a great choice for those seeking flexibility in design.
They offer:
- Easy installation with simple tools and instructions
- Variety of styles, colors, and sizes
- Ability to customize for your specific needs
- Versatility in placement, including walls, ceilings, and floors
- Durable, long-lasting construction to last for years.
Tutorials for building and installation make sliding wardrobe doors quick to put together and offer an extensive spectrum of alternatives.
Pre-Installation Steps: What You Need to Know
Installing sliding wardrobe doors can help maximize your storage space. With some careful planning and the right tools, you can install them smoothly.
Measure Twice, Cut Once
Before getting started, carefully measure the opening of your wardrobe. Note the height, width, and depth. Double-check your measurements to ensure accuracy. This will allow you to purchase doors guaranteed to fit.
Gather Your Materials
You’ll need sliding door hardware, tracks, and panels. Make sure all components are compatible. Other necessities include a drill, screwdriver, level, tape measure, and pencil. Have fasteners like screws on hand as well.
Install the Track
Mount the top track evenly across the top of the opening. Use a level to ensure it’s straight. Follow the manufacturer’s instructions for proper height and installation. Drill pilot holes and use screws to securely fasten it.
Hang the Doors
Slide the door panels into place, aligning the roller wheels with the track. Adjust the rollers as needed to ensure smooth movement. Follow the instructions to install door guides at the bottom.
Safety First
Use safety glasses, dust masks, and gloves during installation. Take precautions on ladders when mounting the track. Go slowly to avoid pinched fingers. Keep children and pets away from power tools.
With an appropriate implementation and approach sliding doors may be fitted to a closet to make the most of the available area. Just measure carefully, gather supplies, and follow all safety advice. Take your time and refer to instructions to do the job right.
Detailed Guide: Installing Sliding Wardrobe Doors
Installing sliding wardrobe doors is a multi-step process that includes:
- Setting up wall liners
- Installing the bottom liner
- Mounting the end panel
Identifying the components and process is essential to enabling a correct implementation. Additionally, knowing how to properly perform a wall-to-wall installation is crucial.
Beginning with the Basics: Understanding Parts and Mechanism
To develop into an expert at putting sliding wardrobe doors, one must comprehend their parts and their internal structure. When arranging a fitted clothing collection, one needs to take into consideration.
- Build interior storage
- All necessary tools and materials
- Measure the opening for accurate doors
- Install bottom and wall liners
- Fix doors to tracks with screws or brackets.
Accurately installing sliding wardrobe doors requires precision, detailed instructions, and expertise.
Wall to Wall Installation
To successfully install sliding wardrobe doors between two walls, it is important to follow the steps outlined in this detailed guide.
- When fitting, ensure the top track is 2mm from the front edge of the wall liner or end panel.
- Drill holes and position the bottom track on the bottom liner before screw-fixing it.
- For no liners, position the bottom track loosely on the floor and secure it into place.
- Finally, use accessories like the Opening Height Reducer, Spacer Blocks, Fixing Blocks, and Angled Ceiling Bracket for larger opening spaces.
Sliding door fitting has never been easier!
Setting Up Wall Liners
When placing a sliding entrance mounting walls as liners is an important phase.
Ensure that the wall liner is cut to size, then stick it to the wall with panel adhesive.
Take note of the following tips:
- Position the wall liner 2mm from the front edge of the wall
- Draw a pencil line 650mm from the back wall
- Remove coving if necessary
- Fit the end panel between a wall and an end panel
- Secure the bottom track to the bottom liner for stability.
Installing the Bottom Liner
Your sliding doors are built on a smooth basis courtesy of the bottom protector. Start by measuring the space to ensure a precise fit. To directly hold the insulation to the exterior surface, use paneled sticky. If an end panel is already installed, position the liner 2mm from its edge. Drill pilot holes and drive screws to hold the liner firmly in place. Take care to keep the bottom edge straight and level. Proper installation of the bottom liner establishes a solid foundation for your wardrobe.
Mounting the End Panel
The end panel anchors your wardrobe installation between walls. After removing any obstructing trim or molding, fit the panel snugly between the walls. Mark the back wall with a pencil and a level before beginning the drilling operation. Attach the panel to the floor, and bottom, and maintain from the wall. Check for plumb and square. Sturdy end panels prevent racking and keep doors tracking smoothly.
Attaching the Top Track
With the top track pre-drilled, position it 2mm from the front of the wall liner or end panel. Use a level to ensure it’s perfectly horizontal. Attach the track securely with screws or brackets. The track must be completely level and aligned to prevent binding. Proper attachment prevents sagging and enables the doors to glide effortlessly. Take care to eliminate any gaps where the track meets the wall.
Securing the Bottom Track
The bottom track keeps doors moving smoothly along the floor. Position the track and check for level. Drill pilot holes to prevent splitting. Attach the track firmly over the bottom liner with screws. Test operation by sliding the doors back and forth. The bottom track should move easily and close up tightly against the wall. Solid attachment prevents vibration and wobbling. A properly installed bottom track ensures your doors operate seamlessly for years to come.
The Final Steps: – Mounting Sliding Doors
Once the liners and tracks have been installed, the final step in installing sliding wardrobe doors is making adjustments and fine-tuning.
This includes ensuring the doors move smoothly, securely, and properly aligned before being fixed in place.
It also involves any additional accessories, such as handles or mirrors, which need to be installed and tested.
Adjustments and Fine-tuning
After the rollers are assembled and all necessary measurements have been completed, the sliding doors to closets are set up and the final adjustments are made.
Sliding Wardrobes Direct offers the following tips for a successful installation:
- Hang the doors onto the tracks
- Adjust for smooth sliding and proper alignment
- Check for any gaps or misalignments
- Secure in place with screws or brackets
- Install any additional accessories
Troubleshooting Common Issues
When installing sliding wardrobe doors, common issues may arise such as misalignment, loud noises, or difficulty with sliding action.
To ensure a smooth installation process, it is important to troubleshoot these issues in order to fix them accordingly.
Sliding Door Alignment
Sliding-door alignment is a common issue among DIY installers, so it is important to understand the proper techniques for troubleshooting and resolving alignment issues.
To ensure proper installation of sliding wardrobe doors, follow these steps:
- Adjust doors for smooth sliding
- Secure doors in place with screws/brackets
- Measure space accurately
- Install accessories (e.g. handles, mirrors)
- Test doors for smooth operation
Noisy Door Movement
It can be frustrating when your sliding wardrobe doors make noise during movement; however, there are some simple solutions to this common issue.
Consult the troubleshooting manual supplied by the sliding door manufacturer, such as the Blizz sliding door instructions, for assistance.
- Ensure that all tracks and rollers are properly lubricated and that all bolts and screws are securely tightened.
- Check the alignment of the tracks and doors and adjust if necessary.
- If a roller is worn out, replace it with a new one.
- If the problem persists, it is best to seek professional assistance.
Ensuring Smooth Sliding Action
It’s crucial to make sure the sliding wardrobe doors function properly after taking the required actions to lessen loud door movement. Here are a few tips to help you achieve this:
- Properly install the top and bottom tracks
- Adjust the door height and width for an even fit
- Check that all screws are tightened
- Test the doors for smooth movement
- Make use of fitting accessories such as fixings and spacers when fitting a sliding door.
Maintenance and Care Tips
To keep sliding wardrobe doors in excellent shape, they need to get routine care and maintenance. Routine cleaning and periodic checks for wear and tear are essential to keep the doors in good shape.
Over time, components may need to be adjusted or tightened to ensure smooth operation.
Cleaning Your Sliding Wardrobe Doors
Maintaining and operating sliding wardrobe doors over time requires regular cleaning. To guarantee peak performance, clean your sliding wardrobe doors according to the following guidelines:
- Use a damp cloth with a mild detergent or cleaning product.
- Wipe gently in a circular motion.
- Remove any debris or dust from the tracks.
- Dry with a clean cloth to avoid water spots.
- Inspect all fixings, screws, and hinges for wear and tear.
Periodic Checks for Wear and Tear
It’s crucial to regularly inspect your sliding wardrobe doors for wear and tear in order to preserve maximum functioning. Inspect the tracks and wheels for any signs of rust or obstruction, as well as the door frames for any cracks or bends. Check for any loose screws and repair as necessary.
It could be time to replace the sliding wardrobe doors if the doors are still not sliding smoothly. Clean all parts regularly and lubricate the tracks and wheels for smooth operation. Use a soft cloth and mild detergent to keep the surface clean and free of dust.
Maintaining your sliding wardrobe doors on a regular basis can guarantee their dependable operation for many years to come.
Adjusting and Tightening Components Over Time
It’s critical to routinely evaluate for wear and abuse on any sliding wardrobe doors in addition to adjusting and tightening components to keep those in ideal health. Here are some tips to follow:
- Check for loose screws and tighten as needed
- Wipe down the tracks and doors regularly
- Apply lubricant to the doors and tracks as recommended
- Readjust the doors to ensure they are aligned properly
Consider how to fit fitted wardrobes in larger spaces.
DIY vs. Professional Installation: Pros and Cons
Installing sliding wardrobe doors yourself can save money, but lacks the expertise of a professional. Evaluating your skills, tools, and time will help determine the best option.
When to Consider a Professional
Professionals are worth the cost when:
- Precise measurements and placement are needed to fit the space correctly. Their expertise ensures proper installation.
- Specialty tools like levels and drills are required. DIY kits don’t provide equipment.
- Instructions seem complex. Experience follows best practices and codes.
- Time is limited between work and family. Professionals work efficiently.
- You want no hassles or mistakes. Their workmanship guarantees quality results.
Cost Implications and Timelines
Purchasing a sliding wardrobe door kit, equipment, and supplies is necessary for a do-it-yourself installation; nonetheless, it can take longer to complete and involve more time for troubleshooting.
On the other hand, professionals have the knowledge and experience for a quicker installation with less hassle.
Evaluating your budget, skills, and schedule makes choosing DIY or professional installation an informed decision.
Final Thoughts
In conclusion, meticulous planning, precise measuring, and deep comprehension of the instructions are necessary to become an expert installer of sliding wardrobe doors. To achieve this, one should consider the following:
- Building and installing wardrobe interior storage
- Ensuring no water pipes or electrical cables in the installation area
- Preparing skirting for wall liners
- Drawing a pencil line on the back wall according to width dimensions
- Knowing how to build a sliding wardrobe.
Following these steps will help ensure the installation process is smooth and successful.
Frequently Asked Questions
What Is the Best Way to Ensure Accuracy When Measuring for Sliding Wardrobe Doors?
Make sure your measurements for moving doors to your wardrobe are perfect by completing a couple of measurements utilizing a measuring tape. Additionally, consult the manufacturer’s instructions and consider any additional accessories that may be needed.
What Type of Tools and Materials Are Required for Installation?
A tool a level, a pencil, a measuring tool, a sliding drawer opening kit, screws and components, wall and bottom liners, panel glue applied, and an end panel are merely a few of the items that are essential to complete the installation of the process.
What Are the Benefits of a DIY Wardrobe Over a Professionally Installed One?
The main benefit of a DIY wardrobe is that it is typically more cost-effective than a professional installation. Additionally, it gives the user more control over the design and materials and allows for a more customized storage solution.
What Is the Average Cost of a Sliding Wardrobe Door Kit?
The average cost of a sliding wardrobe door kit varies depending on size and materials but ranges from around 400.
How Long Does It Take to Install a Sliding Wardrobe Door?
It typically takes 2-3 hours to install a sliding wardrobe door, depending on the size and complexity of the project. Basic tools and instructions are usually provided by the manufacturer.